
Contouring is one of the most popular makeup techniques used to sculpt and define your face, but it’s all about how well you blend. A well-blended contour can enhance your features, create depth, and give you that beautiful, chiseled look. However, without proper blending, contouring can look harsh or unnatural. Whether you’re a beginner or a makeup enthusiast, learning how to blend contour correctly is essential for achieving a seamless, professional finish.
In this post, we’ll guide you through the best techniques and tips for blending contour to perfection.
1. Choose the Right Contour Products
The first step to achieving a flawless contour is to choose the right products. Contour products come in cream, liquid, and powder formulas, and selecting the right one for your skin type and the look you’re aiming for is crucial. Here’s a breakdown of what you might want to use:
Cream or Liquid Contour: These products provide a more natural, dewy finish and are ideal for dry or mature skin. They’re also great for creating a more dramatic, sculpted look.
Powder Contour: Powder contours offer a matte finish and work best on oily or combination skin. They’re also easier to layer and blend for a more subtle effect.
Tip:
Always use a contour product that’s a few shades darker than your skin tone for a natural shadow effect, and choose a highlighter or concealer that’s 1-2 shades lighter to enhance the high points of your face.
2. Prep Your Skin Before Contouring
Before applying contour, it’s important to start with a smooth, hydrated canvas. Start by cleansing and moisturizing your skin to ensure your makeup blends easily. You can also apply a primer that suits your skin type, which will help your makeup stay in place all day.
Tip:
Use a hydrating primer if your skin is dry and a mattifying primer if you have oily skin to ensure your contour blends smoothly and lasts longer.
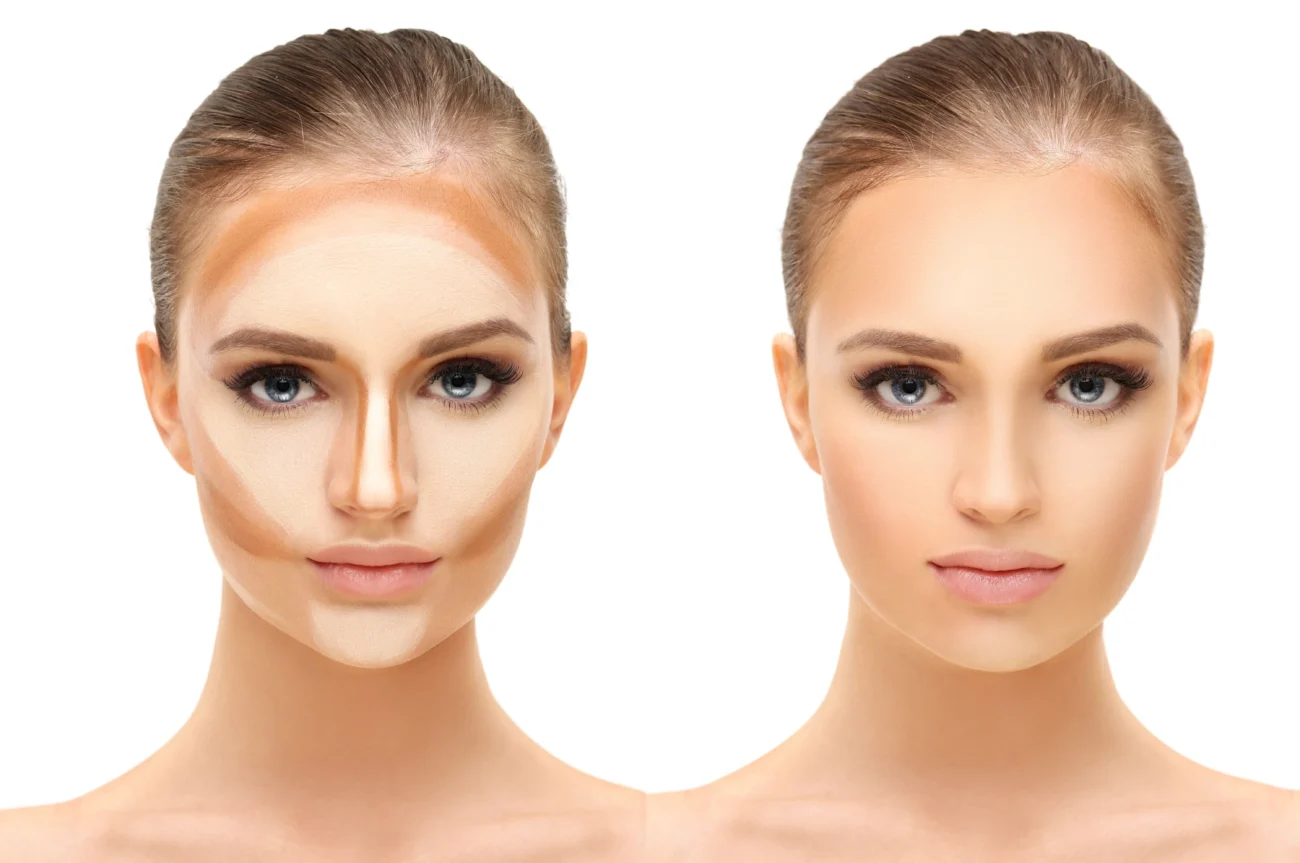
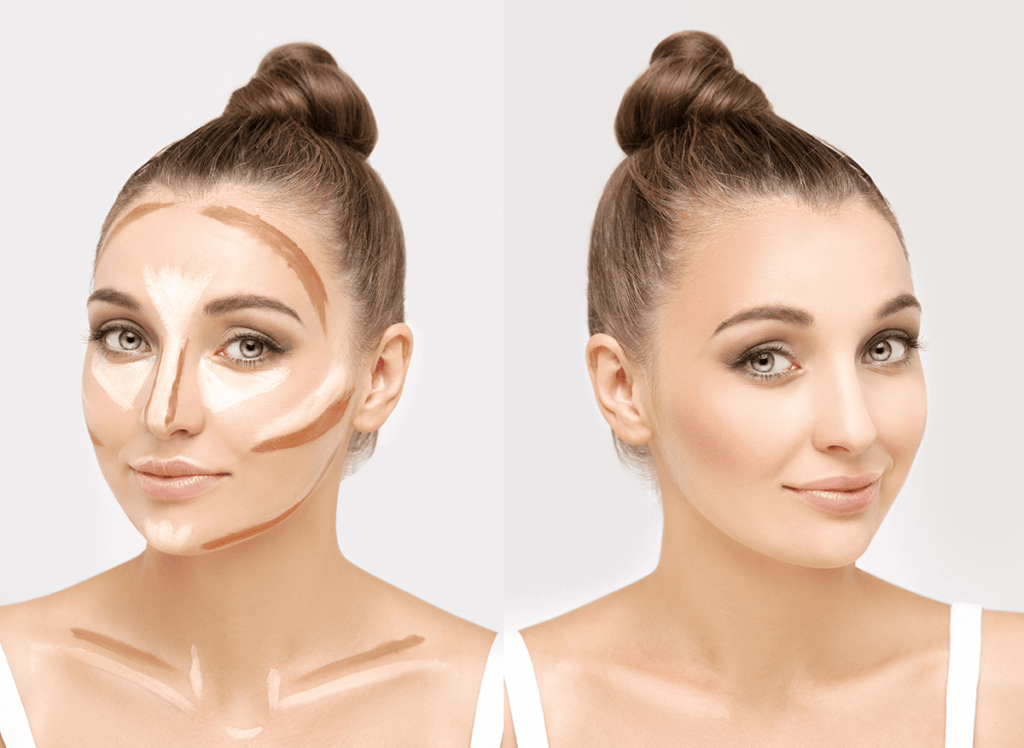
3. Apply Contour to the Right Areas
Now that your skin is prepped, it’s time to apply your contour. The key to a great contour is knowing where to place the product. The goal is to create shadows on your face to add dimension, so focus on the areas where natural shadows would fall.
Here’s where you should apply contour:
Under the cheekbones: Create a “fish face” to find the hollow of your cheeks and apply contour there to create definition.
Along the jawline: Apply contour along your jaw to add sharpness and make the jawline appear more defined.
Along the hairline: Apply contour along your forehead and temples to create a more sculpted appearance and balance your face shape.
On the sides of the nose: If you want to contour your nose, apply a thin line of contour along each side of your nose for a slimming effect.
4. Blend Contour Using the Right Tools
Blending is the most important step in contouring. A beautifully blended contour should seamlessly melt into your skin, creating a natural-looking shadow that enhances your face without looking too harsh.
Tools to Use:
Makeup Sponge (Beauty Blender): A damp sponge is perfect for blending cream or liquid contour products. The soft texture allows you to press the product into the skin, giving you a natural, airbrushed finish.
Contouring Brush: A dense, angled brush works well for blending powder contour, especially on the hollows of the cheeks and along the jawline.
Fan Brush: A fan brush is great for blending contour along the forehead and jawline for a softer look.
How to Blend:
Start with the cheeks: Using your brush or sponge, blend the contour upwards, towards your temples. Avoid blending downward, as this can make the contour look muddy.
Blend along the jawline: Blend the contour along your jawline downward into your neck to ensure the contour looks seamless and natural.
Blend the forehead: Use a light hand to blend the contour along your hairline, making sure there are no harsh lines.
Nose contour: Blend nose contour gently, using a smaller brush or sponge, so the lines look subtle and natural.
Tip:
Always blend your contour in upward motions to lift the face and avoid a drooping effect.
5. Set with Powder (If Using Powder Contour)
Once you’ve blended your contour, it’s time to set it in place. If you’re using powder contour, make sure to set your makeup with a translucent setting powder to prevent it from moving or settling into fine lines.
How to Set:
Lightly dust your face with a translucent powder using a fluffy brush.
Focus on the areas where you applied contour to lock in the product and keep your makeup in place throughout the day.
If you used cream or liquid contour, you might not need much powder, but setting your makeup with a light dusting of translucent powder can help ensure a longer-lasting finish.
6. Highlight to Add Glow
After contouring and blending, it’s time to bring light to the high points of your face. Apply a highlighter to the tops of your cheekbones, down the bridge of your nose, along your brow bone, and in the inner corners of your eyes.
This will contrast with the contour and create a luminous, balanced look. The key to a natural highlight is blending it well so it seamlessly integrates with your contour.
7. Blend, Blend, Blend!
The key to perfect contouring is blending. The more you blend, the more natural your contour will look. If you feel like you’ve applied too much contour, don’t be afraid to go back and blend it out more. If you’ve blended away too much of the product, you can always apply a bit more and blend again.
Tip:
Always take a step back and check your makeup in natural light to make sure the contour looks blended and seamless.
Contouring can be a bit intimidating at first, but with the right products and techniques, it’s easy to master. Remember, the key to contouring is all about blending. When done correctly, contouring can enhance your natural bone structure, add definition, and give your face a sculpted, youthful appearance. Keep practicing, and soon you’ll be contouring like a pro!
What are your favorite contouring tips?
Share them in the comments below!